# 16.7:NAPI 加载原理(上)
笔者在前 6 小结讲述了 NAPI 的基本使用,包括同步和异步实现,本节笔者从源码的角度简单讲解一下NAPI 的加载流程,源码版本为 ArkUI 4.0 Release 版本。
# 16.7.1:hap 工程结构
工程配置签名后打一个 hap 包出来,然后解压该 hap 文件,目录如下所示:
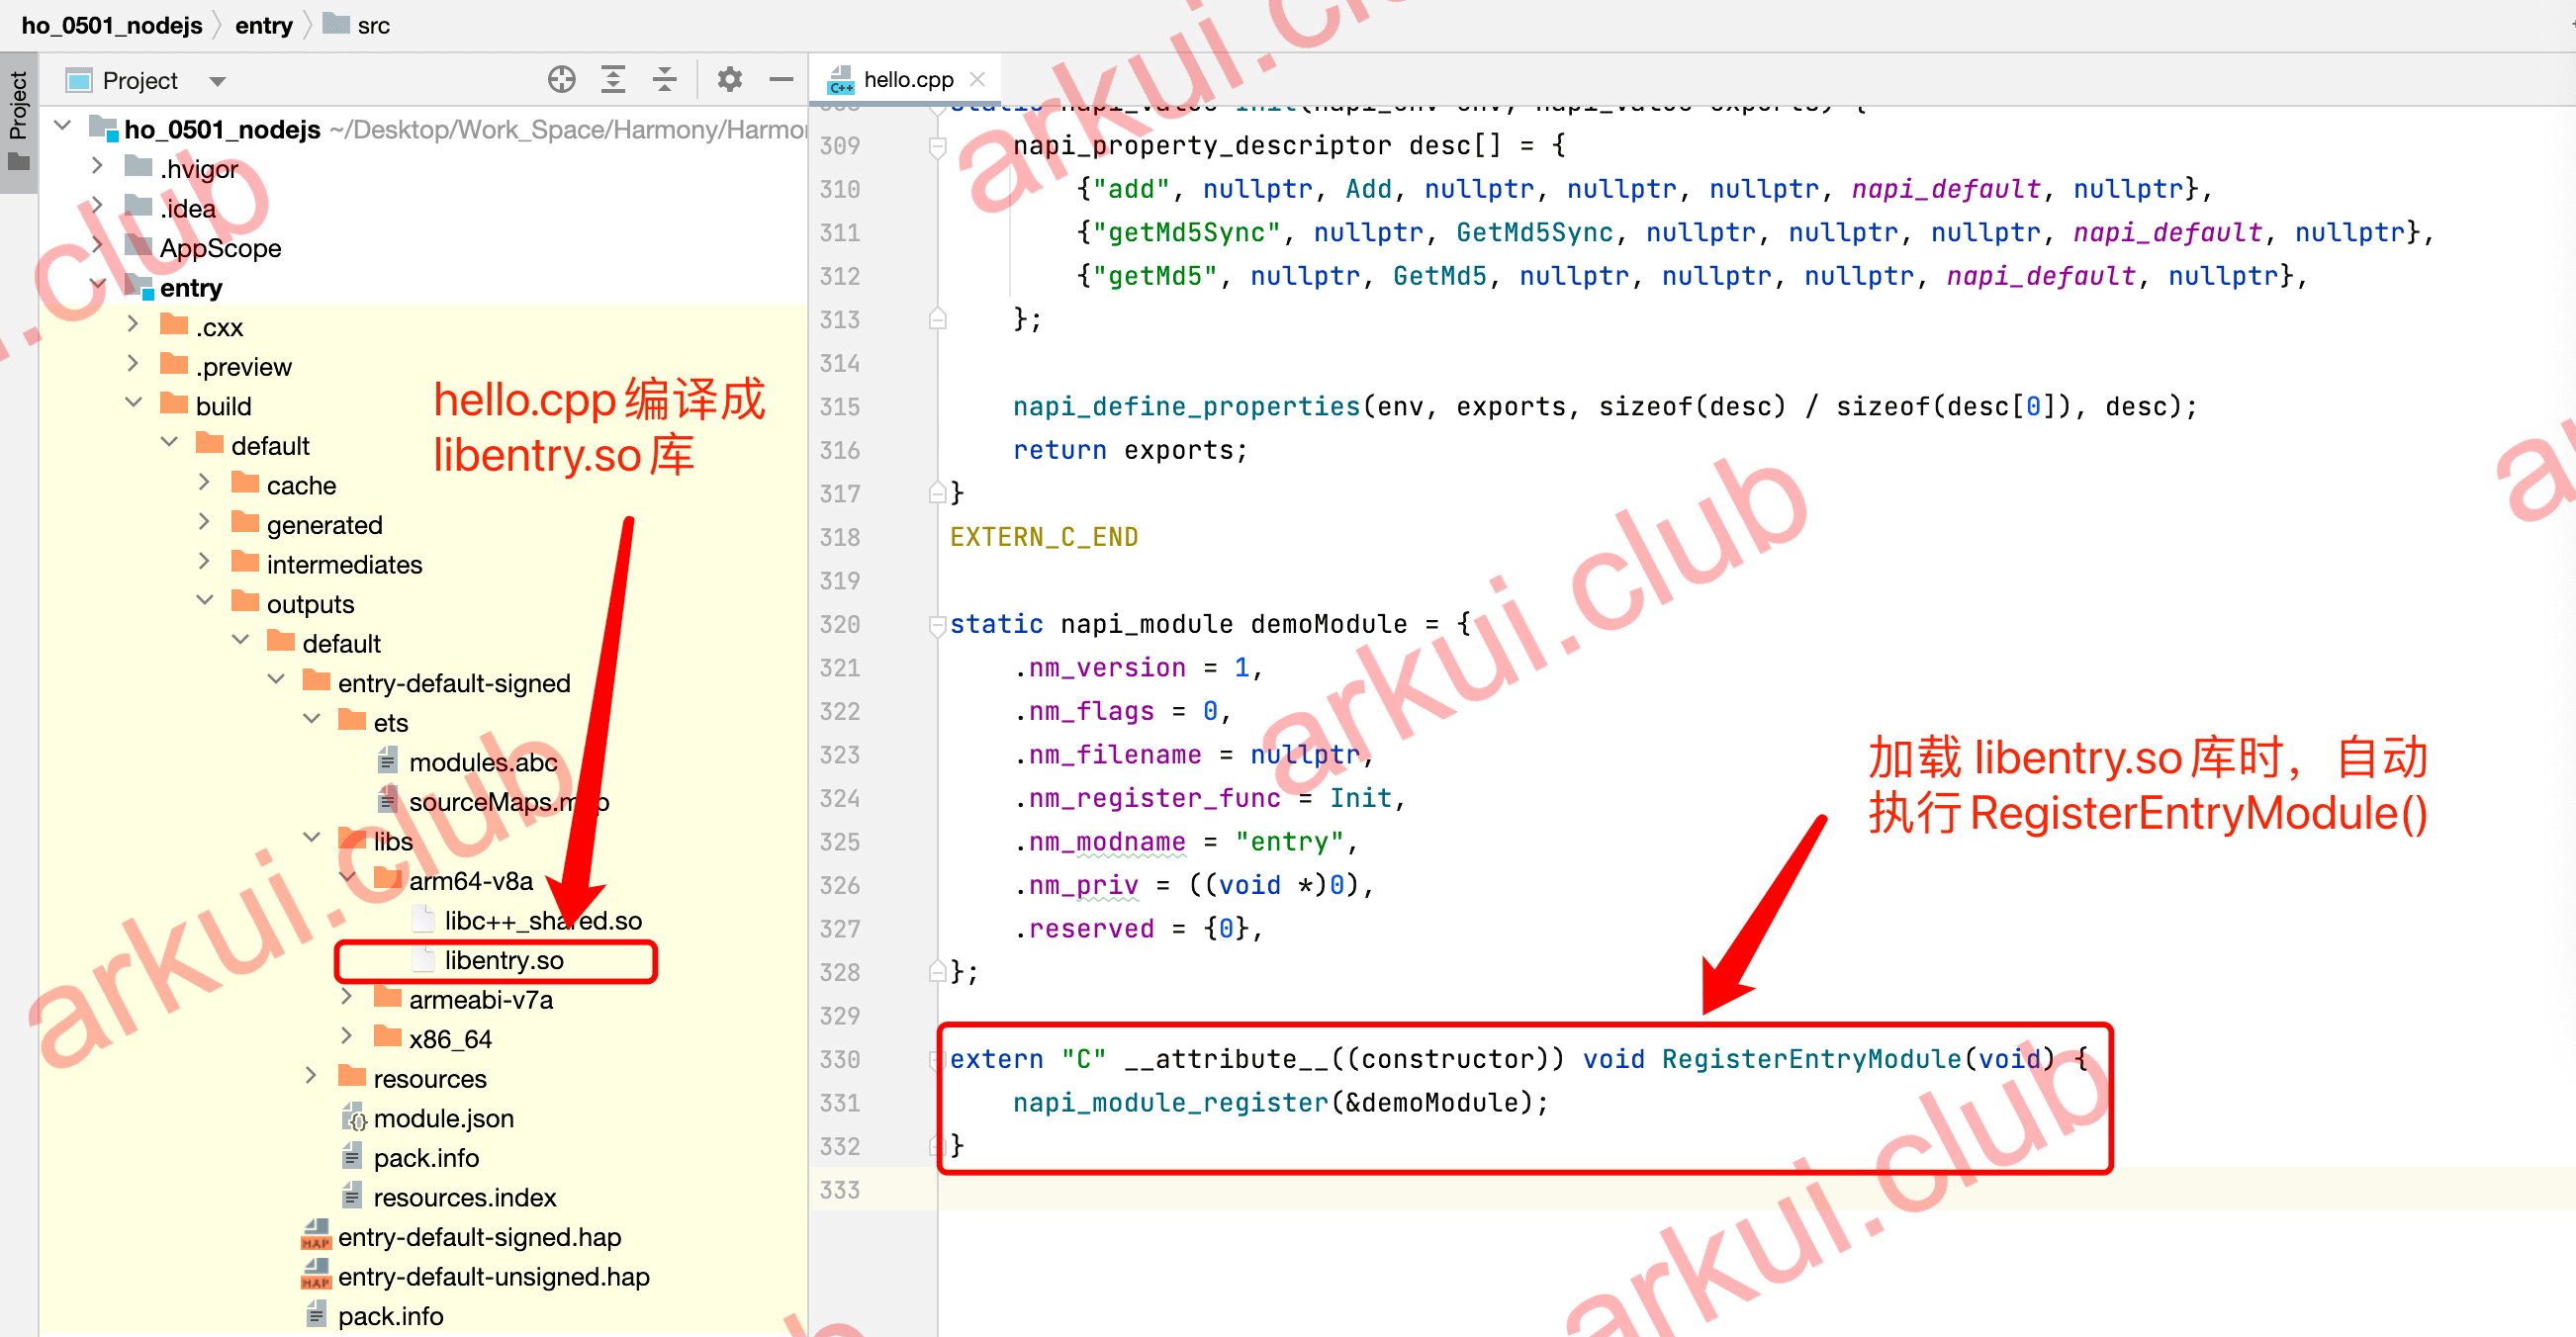
根据解压后的文件目录可知,hello.cpp 文件被编译成了不同平台的动态库 libentry.so,ets 目录存放的是源码编译后的产物 abc 字节码和 map 文件,resources 是打包后的应用资源,比如字符串、图片啥的。当把 hap 安装到设备上时,本质上就是对其解压和拷贝,系统最终把 libentry.so 拷贝到如 app/bundlename/libs/arm64-v8a/libentry.so 的路径下。
# 16.7.2:动态库加载原理
编译后的 libentry.so 库是什么时机加载的呢?我们在 Index.ets 源码中引入 libentry.so 的写法如下:
import testNapi from 'libentry.so';
源码中通过关键字 import 引入了 libentry.so 库,那么它被编译成方舟字节码后是什么样子呢?打开 ets 目录里的 modules.abc,发现引入方式如下所示:
import testNapi from '@app:com.example.ho_0501_nodejs/entry/entry';
根据编译前后的对比可以发现,引入方式由 from libentry.so 转变成了 from @app:com.example.ho_0501_nodejs/entry/entry,在前文笔者提到过方舟字节码是由方舟引擎内部的 EcmaVM 负责解释执行的,每一个应用在进程初始化的时候都会创建一个方舟引擎实例 ArkNativeEngine,ArkNativeEngine 的构造方法源码如下图所示:
ArkNativeEngine::ArkNativeEngine(EcmaVM* vm, void* jsEngine, bool isLimitedWorker) : NativeEngine(jsEngine), vm_(vm), topScope_(vm), isLimitedWorker_(isLimitedWorker) {

    // 省略部分代码……

    void* requireData = static_cast<void*>(this);
    // 创建一个requireNapi()方法
    Local<FunctionRef> requireNapi =
        FunctionRef::New(
            vm,
            [](JsiRuntimeCallInfo *info) -> Local<JSValueRef> {
                // 获取moduleManager
                NativeModuleManager* moduleManager = NativeModuleManager::GetInstance();

                NativeModule* module = nullptr;

                // 调用NativeModuleManager的LoadNativeModule方法加载
                module = moduleManager->LoadNativeModule();

                return scope.Escape(exports);
            },
            nullptr,
            requireData);

    // 获取JS引擎的全局对象
    Local<ObjectRef> global = panda::JSNApi::GetGlobalObject(vm);
    // 创建JS引擎侧的方法名requireName
    Local<StringRef> requireName = StringRef::NewFromUtf8(vm, "requireNapi");
    // 注入 requireNapi 方法
    global->Set(vm, requireName, requireNapi);

    Init();
    panda::JSNApi::SetLoop(vm, loop_);
}
2
3
4
5
6
7
8
9
10
11
12
13
14
15
16
17
18
19
20
21
22
23
24
25
26
27
28
29
30
31
32
33
由源码可知,ArkNativeEngine 在创建的时候接收了一个 EcmaVM 的实例 vm,并向 vm 内部的 global 对象注册了 requireNapi() 方法,当 vm 解释执行到 import testNapi from '@app:com.example.ho_0501_nodejs/entry/entry'; 时,vm 会调用 requireNapi() 方法,该方法内部调用了 NativieModuleManager 的 LoadNativeModule() 方法来加载 so 库,LoadNativeModule() 的源码如下:
NativeModule* NativeModuleManager::LoadNativeModule(const char* moduleName,
    const char* path, bool isAppModule, bool internal, const char* relativePath, bool isModuleRestricted)
{
    // 省略部分代码……

    // 首先从缓存加载 NativeModule
    NativeModule* nativeModule = FindNativeModuleByCache(key.c_str());

    // 缓存不存在,从磁盘加载
    if (nativeModule == nullptr) {
        nativeModule = FindNativeModuleByDisk(moduleName, prefix_.c_str(), relativePath, internal, isAppModule);
    }

    // 省略部分代码……

    return nativeModule;
}
2
3
4
5
6
7
8
9
10
11
12
13
14
15
16
17
LoadNativeModule() 方法先尝试从缓存中取 NativeModuel,如果缓存不存在则从磁盘上加载,引擎首次加载 libentry.so 时缓存肯定是不存在的,因此直接看从磁盘加载的逻辑,FindNativeModuleByDisk() 源码如下所示:
NativeModule* NativeModuleManager::FindNativeModuleByDisk(
    const char* moduleName, const char* path, const char* relativePath, bool internal, const bool isAppModule)
{
    // 获取共享库的3个路径
    char nativeModulePath[NATIVE_PATH_NUMBER][NAPI_PATH_MAX];
    nativeModulePath[0][0] = 0;
    nativeModulePath[1][0] = 0;
    nativeModulePath[2][0] = 0;
    if (!GetNativeModulePath(moduleName, path, relativePath, isAppModule, nativeModulePath, NAPI_PATH_MAX)) {
        HILOG_WARN("get module '%{public}s' path failed", moduleName);
        return nullptr;
    }

    // 从路径1加载共享库
    char* loadPath = nativeModulePath[0];
    LIBHANDLE lib = LoadModuleLibrary(moduleKey, loadPath, path, isAppModule);
    if (lib == nullptr) {
        // 路径1不存在,则从路径2加载
        loadPath = nativeModulePath[1];
        lib = LoadModuleLibrary(moduleKey, loadPath, path, isAppModule);
    }

    const uint8_t* abcBuffer = nullptr;
    size_t len = 0;
    if (lib == nullptr) {
        // 从路径3加载
        loadPath = nativeModulePath[2];
        abcBuffer = GetFileBuffer(loadPath, moduleKey, len);
        if (!abcBuffer) {
            HILOG_ERROR("all path load module '%{public}s' failed", moduleName);
            return nullptr;
        }
    }

    return lastNativeModule_;
}
2
3
4
5
6
7
8
9
10
11
12
13
14
15
16
17
18
19
20
21
22
23
24
25
26
27
28
29
30
31
32
33
34
35
36
FindNativeModuleByDisk() 方法先调用 GetNativeModulePath() 方法获取 3 个本地路径,然后调用 LoadModuleLibrary() 方法尝试从这 3 个路径加载 so,LoadModuleLibrary() 方法源码如下:
LIBHANDLE NativeModuleManager::LoadModuleLibrary(std::string& moduleKey, const char* path,
                                                 const char* pathKey, const bool isAppModule)
{

    // 先尝试从缓存加载
    LIBHANDLE lib = nullptr;
    lib = GetNativeModuleHandle(moduleKey);
    if (lib != nullptr) {
        // 缓存存在则直接返回
        return lib;
    }

    // 以下代码是根据不同的平台做不同模式的加载操作
#if defined(WINDOWS_PLATFORM)
    lib = LoadLibrary(path);
#elif defined(MAC_PLATFORM) || defined(__BIONIC__) || defined(LINUX_PLATFORM)
    lib = dlopen(path, RTLD_LAZY);
#elif defined(IOS_PLATFORM)
    lib = nullptr;
#else
    if (isAppModule && IsExistedPath(pathKey)) {
        Dl_namespace ns = nsMap_[pathKey];
        lib = dlopen_ns(&ns, path, RTLD_LAZY);
    } else {
        lib = dlopen(path, RTLD_LAZY);
    }
#endif

    EmplaceModuleLib(moduleKey, lib);

    return lib;
}
2
3
4
5
6
7
8
9
10
11
12
13
14
15
16
17
18
19
20
21
22
23
24
25
26
27
28
29
30
31
32
LoadModuleLibrary() 方法里先尝试从缓存中取,如果缓存有则直接返回否则根据不同的平台做不同方式的加载,以 LINUX_PLATFORM 平台为例,直接调用系统的 dlopen() 方法加载共享库并把句柄返回,dlopen() 方法简单说明如下:
dlopen() 方法是一个在 Unix-like 系统(包括 Linux)中用于动态加载共享库(.so 文件)的函数,它允许程序在运行时动态地加载和卸载共享库,以及查找共享库中的符号(例如函数和变量)。当使用 dlopen() 方法加载一个共享库(.so 文件)时,它会执行该库中所有的全局构造函数(也称为初始化函数),这些构造函数通常用于初始化库中的静态数据或执行其他一次性设置。
根据 dlopen() 方法的简介,hello.cpp 中添加了一个全局构造函数 RegisterEntryModule(),代码如下所示:
#include <node_api.h>

static napi_module demoModule = {
    .nm_version = 1,
    .nm_flags = 0,
    .nm_filename = nullptr,
    .nm_register_func = Init,
    .nm_modname = "entry",
    .nm_priv = ((void *)0),
    .reserved = {0},
};

// 全局构造方法,当调用 dlopen() 方法加载时,该方法会首先调用
extern "C" __attribute__((constructor)) void RegisterEntryModule(void) {
    napi_module_register(&demoModule);
}
2
3
4
5
6
7
8
9
10
11
12
13
14
15
16
也就是说当调用 dlopen() 方法加载 libentry.so 时,会先调用 RegisterEntryModule() 方法,在该方法内部调用了 napi_module_register(),napi_module_register() 源码如下:
NAPI_EXTERN void napi_module_register(napi_module* mod)
{

    NativeModuleManager* moduleManager = NativeModuleManager::GetInstance();
    NativeModule module;
    // 根据传递进来的mod创建一个NativeModule对象,只使用了mod的部分属性
    module.version = mod->nm_version;
    module.fileName = mod->nm_filename;
    module.name = mod->nm_modname;
    module.registerCallback = (RegisterCallback)mod->nm_register_func;
    // 调用NativeModuleManager的Register()方法注册NativeModule
    moduleManager->Register(&module);
}
2
3
4
5
6
7
8
9
10
11
12
13
napi_module_register() 的方法很简单,根据传递进来的 mod 构造一个 NativeModule 实例 module,然后调用 NativeModuleManager 的 Register() 方法注册它。
📢:从创建 NativeModule 的源码可知,hello.cpp 里 demoModule 设置的 nm_flags,nm_priv,reserved 参数暂时是无用的。
Register() 方法源码如下所示:
void NativeModuleManager::Register(NativeModule* nativeModule)
{

    std::lock_guard<std::mutex> lock(nativeModuleListMutex_);
    // 创建链表并给lastNativeModule_赋值
    if (!CreateNewNativeModule()) {
        HILOG_ERROR("create new nativeModule failed");
        return;
    }
    // 把nativeModule的值传递给尾结点
    lastNativeModule_->version = nativeModule->version;
    lastNativeModule_->fileName = nativeModule->fileName;
    lastNativeModule_->isAppModule = isAppModule_;
    lastNativeModule_->name = moduleName;
    lastNativeModule_->refCount = nativeModule->refCount;
    lastNativeModule_->registerCallback = nativeModule->registerCallback;
    lastNativeModule_->getJSCode = nativeModule->getJSCode;
    lastNativeModule_->getABCCode = nativeModule->getABCCode;
    lastNativeModule_->next = nullptr;
    lastNativeModule_->moduleLoaded = true;
}

// 创建一个链表并给尾结点lastNativeModule_赋值,链表头结点为firstNativeModule_,
bool NativeModuleManager::CreateNewNativeModule()
{
    if (firstNativeModule_ == lastNativeModule_ && lastNativeModule_ == nullptr) {
        firstNativeModule_ = new NativeModule();
        if (firstNativeModule_ == nullptr) {
            HILOG_ERROR("first NativeModule create failed");
            return false;
        }
        lastNativeModule_ = firstNativeModule_;
    } else {
        auto next = new NativeModule();
        if (next == nullptr) {
            HILOG_ERROR("next NativeModule create failed");
            return false;
        }
        if (lastNativeModule_) {
            lastNativeModule_->next = next;
            lastNativeModule_ = lastNativeModule_->next;
        }
    }
    return true;
}
2
3
4
5
6
7
8
9
10
11
12
13
14
15
16
17
18
19
20
21
22
23
24
25
26
27
28
29
30
31
32
33
34
35
36
37
38
39
40
41
42
43
44
45
Register() 方法的执行逻辑很清楚,先调用 CreateNewNativeModule() 创建一个 NativeModule 链表,该链表头结点是 firstNativeModule_,尾结点是 lastNativeModule_,最后把传递进来的 nativeModule 的值赋值给尾结点 lastNativeModule_,总结起来就是 Register() 方法负责把传递进来的 NativeModule 加入链表的末尾。
# 16.7.3:小结
由于篇幅原因,本节笔者简单讲解了 JS 引擎解释执行到 import 语句时会由 NativieModuleManager 加载动态库,加载的过程就是把 NativeModule 添加到 NativieModuleManager 的内部链接末尾,下一小节笔者介绍 JS 引擎解释执行 testNapi.add() 的过程,敬请期待……