# 18.12:屏幕截图
笔者曾经做过屏幕截图的场景:用户在 APP 上办理业务后有个签名操作,在用户签名完成后会把签名截图留存,本节笔者讲解一下如何在 OpenHarmony 实现屏幕截图功能。
# 18.12.1:使用系统 API
ArkUI 开发框架在 @ohos.screenshot 模块里提供了屏幕截图功能,它支持截取屏幕时设置截取的位置、大小,旋转角度等,但该接口为系统接口,有做系统应用的可直接使用该模块。
引入模块
import screenshot from '@ohos.screenshot';1实现截图
public screenShot() {
  let screenshotOptions = {
  	"screenRect": {
      "left": 200,
      "top": 100,
      "width": 200,
      "height": 200
    },
  	"imageSize": {
      "width": 300,
      "height": 300
    },
    "rotation": 0,
    "displayId": 0
  };
  screenshot.save(screenshotOptions, (err, pixelMap) => {
    if (pixelMap) {
      console.log('Succeeded in saving sreenshot. Pixel bytes number: ' + pixelMap.getPixelBytesNumber());
      pixelMap.release();
    } else {
      console.log('Failed to save screenshot. Code: ' + JSON.stringify(err));
    }
  });
}
1
2
3
4
5
6
7
8
9
10
11
12
13
14
15
16
17
18
19
20
21
22
23
24
📢:以上截图能力为系统应用提供。
# 18.12.2:使用公共 API
ArkUI 开发框架在 @kit.ArkUI 模块里给 Window 提供了 snapshot() 方法来获取当前窗口的快照,它返回一个 PixelMap,因此我们也可以使用该方法获取屏幕截图。
获取 Window 对象
UIAbility 的
onWindowStageCreate()方法是加载页面的入口,它对外提供一个 WindowStage 对象,该对象可以获取当前 Window, 然后把获取到的 Window 存储在 globalThis 中方便后续使用,代码如下:onWindowStageCreate(windowStage: Window.WindowStage) { // 获取到 Window 后保存在全局变量中 var mainWindow = windowStage.getMainWindowSync(); GlobalHolder.mainWindow = mainWindow; windowStage.loadContent("pages/Index", (err, data) => { // …… }); }1
2
3
4
5
6
7
8
9
10实现屏幕截图
有了 Window 对象后,就可以调用它的
snapshot()方法了,代码如下所示:private snapshot() { var window = GlobalHolder.mainWindow as window.Window; window.snapshot((error, image) => { if (image) { console.log("snapshot success"); } else { console.log("snapshot failure: " + JSON.stringify(error)); } }); }1
2
3
4
5
6
7
8
9
10
# 18.12.3:获取部分截图
拿到屏幕截图 PixelMap 后,如果想获取其中一部分截图,可以使用 PixelMap 的 crop() 方法,样例代码如下所示:
private cropPixelMap(image: image.PixelMap, x: number, y: number, width: number, height: number) {
  image.crop({
    x: x,
    y: y,
    size: {
      width: width,
      height: height
    }
  }).then(() => {
    console.log("crop image success");
  }).catch((error) => {
    console.log("crop image failure: " + JSON.stringify(error));
  })
}
2
3
4
5
6
7
8
9
10
11
12
13
14
📢:PixelMap 提供了众多图片操作相关的 API,读者可自行查看文档。
# 18.12.4:对组件截图
ArkUI开发框架在 @kit.ArkUI 模块提供了 componentSnapshot 对组件进行截图,用法如下:
设置组件属性
componentSnapshot要求传递组件的 id,因此先给待截图组件添加唯一的 id,样例代码如下所示:Button("区域截图") .width(220) .height(50) .id(this.screenshotWidgetID) // 给组件添加 id 属性1
2
3
4实现屏幕截图
给目标组件指定 id 后,可以调用
componentSnapshot的snapshot()方法获取截图内容:private snapshot() { componentSnapshot.get(this.screenshotWidgetID, (error, image) => { if (error) { console.log("snapshot failure: " + JSON.stringify(error)); } else if (image) { this.image = image; console.log("snapshot success"); } else { console.log("snapshot failure: "); } }, {scale: 1, waitUntilRenderFinished: true}) }1
2
3
4
5
6
7
8
9
10
11
12
# 18.12.5:完整样例
完整样例如下所示:
import { ContextHolder } from './context_holder';
import { componentSnapshot, window } from '@kit.ArkUI';
@Entry @Component struct ArkUIClubScreenShotTest {
@State image: PixelMap | null = null;
private screenshotWidgetID = "screenshot_button_id";
build() {
Column({space: 10}) {
Image(this.image)
.width(220)
.height(220)
.objectFit(ImageFit.ScaleDown)
.backgroundColor(Color.Pink)
Button("屏幕截图")
.width(220)
.height(50)
.fontWeight(FontWeight.Bold)
.onClick(() => {
this.screenShot();
})
Button("区域截图")
.width(220)
.height(50)
.id(this.screenshotWidgetID)
.onClick(() => {
this.snapshot();
})
}
.width('100%')
.height('100%')
.backgroundColor("#aabbcc")
}
private snapshot() {
  componentSnapshot.get(this.screenshotWidgetID, (error, image) => {
    if (error) {
      console.log("snapshot failure: " + JSON.stringify(error));
    } else if (image) {
      this.image = image;
      console.log("snapshot success");
    } else {
      console.log("snapshot failure: ");
    }
  }, {scale: 1, waitUntilRenderFinished: true})
}
private screenShot() {
let window = ContextHolder.window as window.Window;
window.snapshot((error, image) => {
if (image) {
this.image = image;
console.log("snapshot success");
} else {
console.log("snapshot failure: " + JSON.stringify(error));
}
});
}
}
2
3
4
5
6
7
8
9
10
11
12
13
14
15
16
17
18
19
20
21
22
23
24
25
26
27
28
29
30
31
32
33
34
35
36
37
38
39
40
41
42
43
44
45
46
47
48
49
50
51
52
53
54
55
56
57
58
59
60
61
62
63
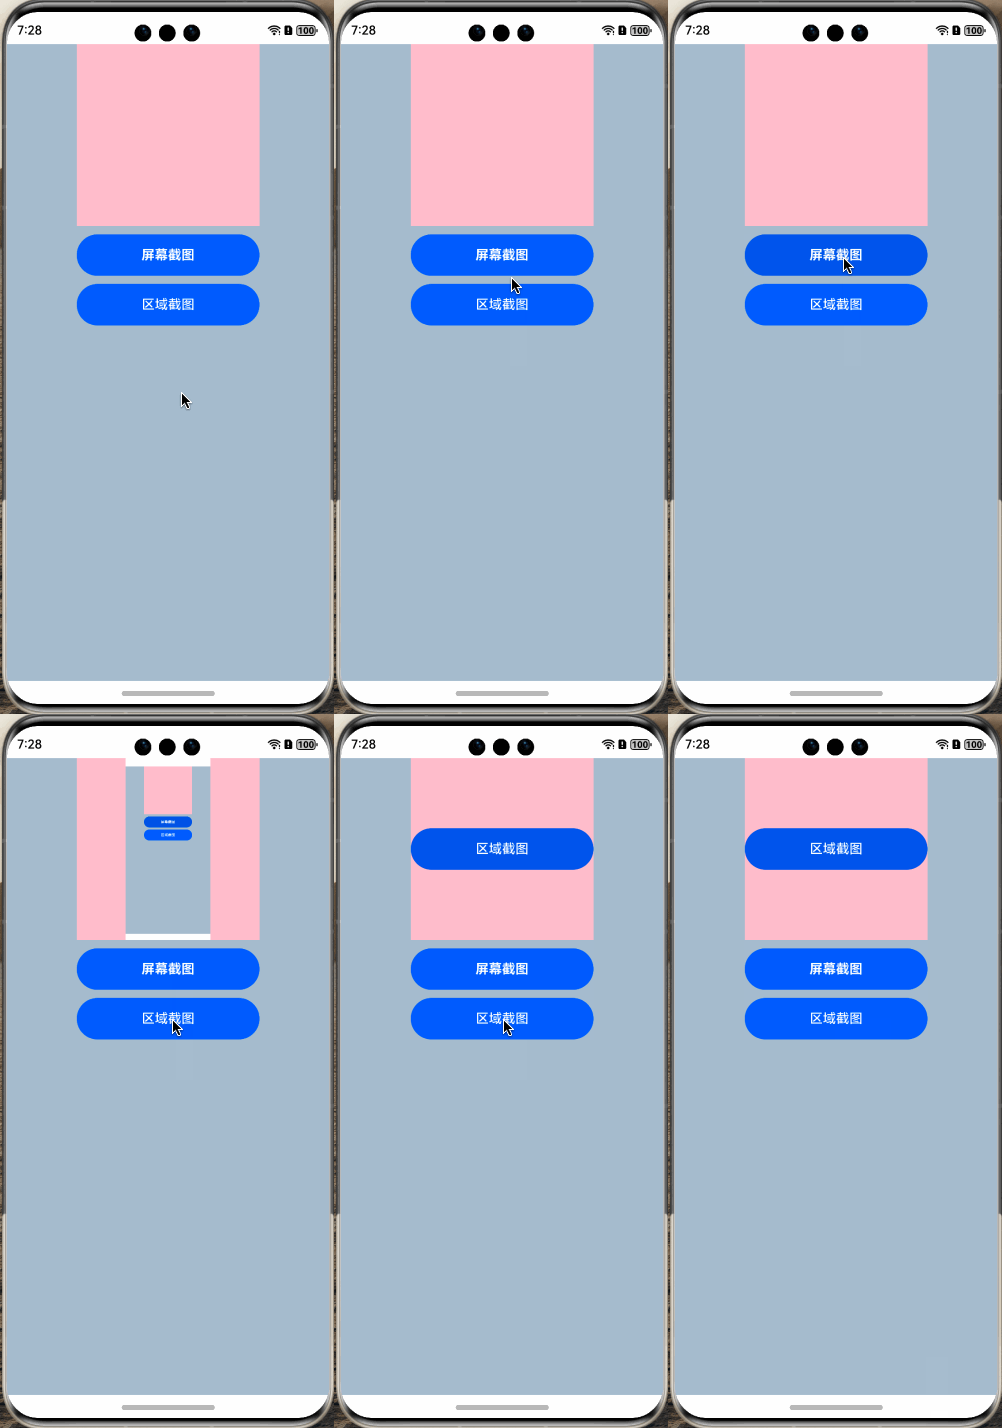
样例运行结果如下图所示:

← 18.11:异常捕获 18.13:主题切换 →

