# 17.7:分布式计算
分布式能力是 OpenHarmony 操作系统的核心能力之一,它目前仅支持在统一局域网下拉起远端 FA 的能力,本节笔者简单介绍一下如何在一台设备上拉起组网内的另一台设备并进行协同计算。
# 17.7.1:分布式设备管理
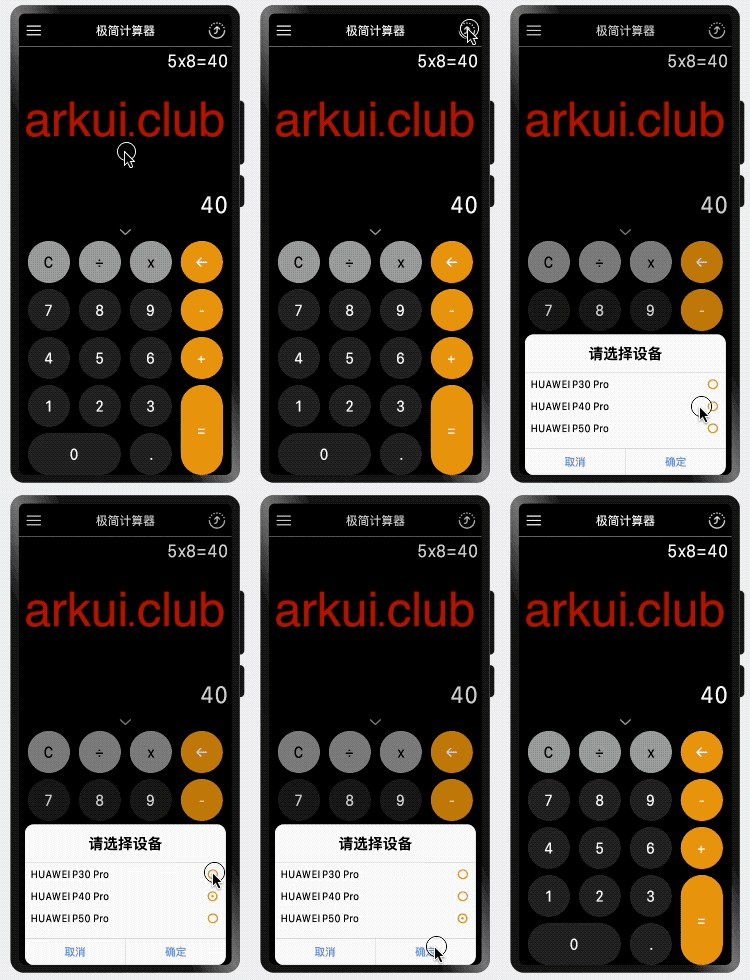
在《极简计算器》应用里,分布式设备管理包含了分布式设备搜索、分布式设备列表弹窗和拉起远端设备以及分布式数据管理四部分,首先在分布式组网内搜索设备,接着把搜索到的分布式设备添加到设备列表弹窗中,然后根据用户的选择拉起远端设备,最后同步数据。操作结果样式如下所示:

# 17.7.2:分布式设备搜索
分布式设备搜索就是通过 @ohos.distributedHardware.deviceManager 模块提供的相关 API 查询组网内的分布式设备,代码如下所示:
// 创建deviceManager实例
private createDistributeDeviceManager() {
  distributedDeviceManager.createDeviceManager(BUNDLE_NAME, (error, deviceManager) => {
    if(deviceManager) {
      this.deviceManager = deviceManager;
      this.searchDistributedDevice();
      this.monitorDistributeDevice();
    } else {
      ToastUtils.show("error: " + error);
    }
  });
}

// 根据deviceManager实例搜寻设备
private searchDistributedDevice() {
  if(this.deviceManager) {
    // 发现设备
    this.deviceManager.startDeviceDiscovery({
      subscribeId: Math.floor(65536 * Math.random()),
      mode: distributedDeviceManager.DiscoverMode.DISCOVER_MODE_ACTIVE,
      medium:distributedDeviceManager.ExchangeMedium.COAP,
      freq: distributedDeviceManager.ExchangeFreq.HIGH,
      isSameAccount: false,
      isWakeRemote: true,
      capability: distributedDeviceManager.SubscribeCap.SUBSCRIBE_CAPABILITY_DDMP
    });

    // 获取在线设备
    let devices = this.deviceManager.getTrustedDeviceListSync();
    devices.forEach((device) => {
      this.notifyDeviceOnline(device);
    });
  }
}

// 监听设备上下线状态
private monitorDistributeDevice() {
  if(this.deviceManager) {
    // 监听设备状态
    this.deviceManager.on("deviceStateChange", (data) => {
      if(data) {
        switch(data.action) {
          case distributedDeviceManager.DeviceStateChangeAction.ONLINE:
          case distributedDeviceManager.DeviceStateChangeAction.READY:
                this.notifyDeviceOnline(data.device);
                break;
          case distributedDeviceManager.DeviceStateChangeAction.CHANGE:
          case distributedDeviceManager.DeviceStateChangeAction.OFFLINE:
                this.notifyDeviceOffline(data.device);
                break;
        }
      }
    });

    // 发现设备
    this.deviceManager.on("deviceFound", (data) => {
      if(data) {
        this.notifyDeviceOnline(data.device);
      }
    });

  }
}
2
3
4
5
6
7
8
9
10
11
12
13
14
15
16
17
18
19
20
21
22
23
24
25
26
27
28
29
30
31
32
33
34
35
36
37
38
39
40
41
42
43
44
45
46
47
48
49
50
51
52
53
54
55
56
57
58
59
60
61
62
63
以上就是分布式设备搜索的主要流程,首先调用 createDistributeDeviceManager() 方法获取一个 deviceManager 实例,接下来调用该实例的相关 API 查询和监听设备的上下线状态等操作。
# 17.7.3:分布式设备弹窗
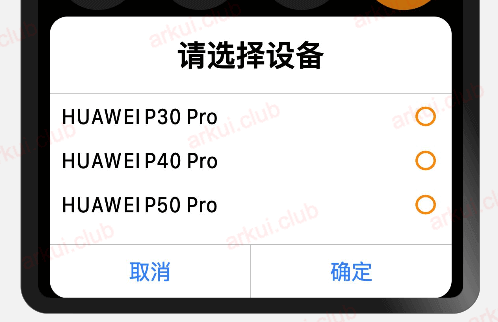
分布式设备列表弹窗展示在线设备列表,并允许用户选择远端设备,如下图所示,用户可以根据设备名称选择相应的设备进行协同结算:

设备列表弹窗使用的自定义对话框的方式实现的,笔者在第九章 第 4 节 部分讲述了自定义弹窗的实现,读者可自行阅读,弹框对话框实现如下所示:
@CustomDialog export struct DistributeDialog {

  private controller: CustomDialogController;

  private selectedIndex: number = -1;

  callback: (device: DistributeDevice) => void;

  @State deviceList: Array<DistributeDevice> = [];

  build() {
    Stack() {
      Column() {

        Text("请选择设备")
          .fontSize(25)
          .fontWeight(FontWeight.Bold)
          .margin({top: 15})

        Text()
          .size({width: "100%", height: "2px"})
          .backgroundColor("#bebbc1")
          .margin({top: 15})

        List() {
          ForEach(this.deviceList, (device: DistributeDevice, index: number) => {
            ListItem() {
              Row() {
                Text(device.name)
                  .fontSize(18)
                  .padding({top: 8, bottom: 8})
                Blank()
                Image(device.isSelected() ? $r("app.media.icon_selected") : $r("app.media.icon_unselect"))
                  .width(25)
                  .height(25)
              }
              .padding({left: 10, right: 10})
              .width("100%")
            }
            .width("100%")
            .onClick(() => {
              console.log("item clicked")
              if(-1 != this.selectedIndex) {
                this.deviceList[this.selectedIndex].setSelected(false);
              }
              this.selectedIndex = index;
              device.setSelected(true);
              let tempList = new Array<DistributeDevice>();
              this.deviceList.forEach((item) => {
                tempList.push(item);
              })
              this.deviceList = tempList;
            })
          });
        }
        .width("100%")

        Text()
          .size({width: "100%", height: "2px"})
          .backgroundColor("#bebbc1")
          .margin({top: 15})
        Row() {
          Text("取消")
            .height("100%")
            .layoutWeight(1)
            .textAlign(TextAlign.Center)
            .fontSize(18)
            .fontColor("#317ef5")
            .onClick(() => {
              this.controller.close(); // 关闭弹窗
            })
          Text()
            .size({width: "2px", height: "100%"})
            .backgroundColor("#bebbc1")
          Text("确定")
            .textAlign(TextAlign.Center)
            .fontSize(18)
            .fontColor("#317ef5")
            .height("100%")
            .layoutWeight(1)
            .onClick(() => {
              if(-1 == this.selectedIndex) {
                ToastUtils.show("请选择设备");
                return;
              }
              this.controller.close(); // 关闭弹窗
              this.callback?.call(this, this.deviceList[this.selectedIndex]);
            })
        }
        .height(45)
        .width('100%')
      }
      .backgroundColor("#ffffff")
      .borderRadius(15)
    }
    .padding({left: 10, right: 10})
    .width("100%")
  }

  aboutToAppear() {
    if(this.deviceList.length > 0) {
      console.log("distribute device size: " + this.deviceList.length);
    } else {
      this.deviceList = [
        new DistributeDevice("123", "HUAWEI P30 Pro"),
        new DistributeDevice("123", "HUAWEI P40 Pro"),
        new DistributeDevice("123", "HUAWEI P50 Pro"),
      ]
    }
  }

}
2
3
4
5
6
7
8
9
10
11
12
13
14
15
16
17
18
19
20
21
22
23
24
25
26
27
28
29
30
31
32
33
34
35
36
37
38
39
40
41
42
43
44
45
46
47
48
49
50
51
52
53
54
55
56
57
58
59
60
61
62
63
64
65
66
67
68
69
70
71
72
73
74
75
76
77
78
79
80
81
82
83
84
85
86
87
88
89
90
91
92
93
94
95
96
97
98
99
100
101
102
103
104
105
106
107
108
109
110
111
112
# 17.7.4:分布式设备拉起
当用户选择一个分布式设备后,要把这个设备拉起,需要借助 @ohos.ability.featureAbility 模块相关的 API ,相关代码如下所示:
private startDistributedDevice(deviceId: string) {
  featureAbility.startAbility({
    want: {
      bundleName: "com.arkui.simple.calculator",
      abilityName: "com.arkui.simple.calculator.MainAbility",
      deviceId: deviceId,
      parameters: {
        isFA: 'FA'
      }
    }
  }, (error, data) => {
    ToastUtils.show("error: " + error + ", data: " + data);
  });
}
2
3
4
5
6
7
8
9
10
11
12
13
14
# 17.7.5:分布式数据管理
分布式数据管理用于实现协同计算时数据在多端设备之间的相互同步,因此需要创建一个分布式数据库来保存协同计算时数据,并通过分布式数据通信进行同步。
// kvManager实例
private createKVManager() {
  distributedData.createKVManager({
    userInfo: {
      userId: User.get().getId(),
      userType: distributedData.UserType.SAME_USER_ID
    },
    bundleName: Constant.BUNDLE_NAME
  }, (error, data) => {
    if(data) {
      this.kvManager = data;
    }
  });
}

// kvStore实例
private createKVStore() {
  if(this.kvManager) {
    this.kvManager.getKVStore(Constant.STORE_ID, {
      createIfMissing: true,
      encrypt: false,
      backup: false,
      autoSync: true,
      kvStoreType: distributedData.KVStoreType.MULTI_VERSION,
      securityLevel: distributedData.SecurityLevel.S0
    }, (error, result) => {
      if(result) {
        this.kvStore = result;
      }
    });
  }
}

// 监听数据变化
private monitorData() {
  if(this.kvStore) {
    this.kvStore.on("dataChange", distributedData.SubscribeType.SUBSCRIBE_TYPE_REMOTE, (data) => {
      // received data
    })
  }
}

// 向远端设备发送数据
public sendData(key: string, value: string) {
  if(this.kvStore) {
    this.kvStore.put(key, value, (error, data) => {
      // send data
    });
  }
}
2
3
4
5
6
7
8
9
10
11
12
13
14
15
16
17
18
19
20
21
22
23
24
25
26
27
28
29
30
31
32
33
34
35
36
37
38
39
40
41
42
43
44
45
46
47
48
49
50
# 17.7.6:小结
以上就是分布式计算的简单介绍,核心就是使用 @ohos.distributedHardware.deviceManager 模块的设备发现功能和 @ohos.data.distributedData 模块的数据同步功能,由于笔者没有设备做验证,本节只是笔者梳理的分布式计算的操作流程,后续有设备验证了,笔者再补充完整的交互流程。
← 17.6:用户登录 17.8:多语言支持 →

