# 18.3:沉浸式设置
HarmonyOS 4.0 已经支持使用 ArkUI 开发框架开发 APP 了,使用最新版 DevEco Studio 创建一个 HarmonyOS 工程,编辑 index.ets 页面,代码如下:
@Entry @Component struct Index {
  build() {
    Column() {
      Text("OpenHarmony")
        .fontSize(35)
    }
    .width('100%')
    .height('100%')
    .backgroundColor(Color.Pink) // 设置页面背景色为 Pink
  }
}
2
3
4
5
6
7
8
9
10
11
默认情况下页面启动后的布局样式是带有一个黑色背景的状态栏,如下所示:
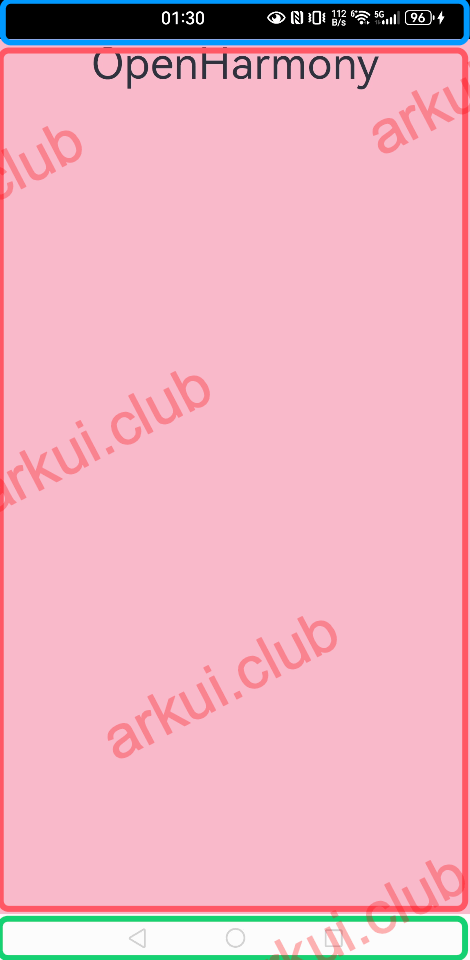
页面布局从上往下看,蓝色框表示的系统状态栏,红色框表示的 APP 页面,绿色框表示的导航栏,如果想把页面做成 Android 或 iOS 那样的沉浸式样式,该如何实现呢?本节笔者就简单介绍一下在 HarmonyOS 上实现沉浸式的做法。
# 18.3.1:隐藏导航栏
ArkUI 开发框架在 @ohos.window 模块中提供了设置隐藏状态栏和导航栏的方法 setSystemBarEnable(names: Array<'status' | 'navigation'>),该方法参数 names 是一个数组,只支持 status 和 navigation。设置隐藏导航栏只需要设置 names 参数只包含 status 即可,如果都不显示只设置 names 为 [] 即可。在 EntryAbility 的 onWindowStageCreate() 方法内设置代码如下:
export default class EntryAbility extends UIAbility {

  onWindowStageCreate(windowStage: window.WindowStage) {
    windowStage.loadContent('pages/Index', (err, data) => {
      if (err.code) {
        hilog.error(0x0000, 'testTag', 'Failed to load the content. Cause: %{public}s', JSON.stringify(err) ?? '');
        return;
      }
      hilog.info(0x0000, 'testTag', 'Succeeded in loading the content. Data: %{public}s', JSON.stringify(data) ?? '');
    });

    let mainWindow = windowStage.getMainWindowSync();
    mainWindow.setWindowSystemBarEnable(["status"]);
  }
}
2
3
4
5
6
7
8
9
10
11
12
13
14
15
项目运行结果如下图所示:

如上图所示,页面的状态栏是黑色背景,此时还需要设置状态栏颜色才能完美体验沉浸式。
# 18.3.2:设置状态栏颜色
ArkUI 开发框架在 @ohos.window 库中提供了设置状态栏颜色的方法 setSystemBarProperties() 和设置布局充满全屏的方法 setLayoutFullScreen(),如果实现沉浸式,可以设置状态栏颜色为透明,然后让页面布局充满全屏,代码如下:
export default class EntryAbility extends UIAbility {

  onWindowStageCreate(windowStage: window.WindowStage) {
    windowStage.loadContent('pages/Index', (err, data) => {
      if (err.code) {
        hilog.error(0x0000, 'testTag', 'Failed to load the content. Cause: %{public}s', JSON.stringify(err) ?? '');
        return;
      }
      hilog.info(0x0000, 'testTag', 'Succeeded in loading the content. Data: %{public}s', JSON.stringify(data) ?? '');
    });

    let mainWindow = windowStage.getMainWindowSync();
    mainWindow.setWindowSystemBarEnable(["status"]);
    mainWindow.setWindowSystemBarProperties({
      statusBarColor: "#00000000"
    })
    mainWindow.setWindowLayoutFullScreen(true)
  }
}
2
3
4
5
6
7
8
9
10
11
12
13
14
15
16
17
18
19
样例运行结果如下所示:

从运行效果看,即将达到沉浸式效果了,但是 OpenHarmony 文字却显示在了状态栏下边,因为 setLayoutFullScreen() 方法设置全屏布局会导致状态栏遮挡布局内容,为了解决状态栏遮挡的问题,可以设置一下页面根组件的 paddingTop 值为状态栏的高度即可。
# 18.3.3:获取状态栏高度
获取状态栏高度,可以利用 @ohos.window 库中提供的 getWindowAvoidArea() 方法,代码如下:
private getStatusBarHeight() {
  window.getLastWindow(getContext(this), (error, topWindow) => {
    if (topWindow) {
      let area = topWindow.getWindowAvoidArea(window.AvoidAreaType.TYPE_SYSTEM);
      this.statusBarHeight = px2vp(area.topRect.height)
      console.log("statusBarHeight: " + this.statusBarHeight)
    }
  });
}
2
3
4
5
6
7
8
9
获取到状态栏高度后,就可以设置页面的根组件的 paddingTop 值了。
# 18.3.4:完整样例
import { router, window } from '@kit.ArkUI';

@Entry @Component struct Index {

  @State statusBarHeight: number = 0;

  build() {

    Column() {
      Text("OpenHarmony")
        .fontSize(35)

      Button("打开第二页")
        .onClick(() => {
          router.pushUrl({
            url: "pages/second"
          })
        })
    }
    .width('100%')
    .height('100%')
    .backgroundColor(Color.Pink)
    .padding({top: this.statusBarHeight}) // paddingTop 值
  }

  aboutToAppear() {
    this.getStatusBarHeight()
  }

  // 获取状态栏高度
  private getStatusBarHeight() {
    window.getLastWindow(getContext(this), (error, topWindow) => {
      if (topWindow) {
        let area = topWindow.getWindowAvoidArea(window.AvoidAreaType.TYPE_SYSTEM);
        this.statusBarHeight = px2vp(area.topRect.height)
        console.log("statusBarHeight: " + this.statusBarHeight)
      }
    });
  }
}
2
3
4
5
6
7
8
9
10
11
12
13
14
15
16
17
18
19
20
21
22
23
24
25
26
27
28
29
30
31
32
33
34
35
36
37
38
39
40
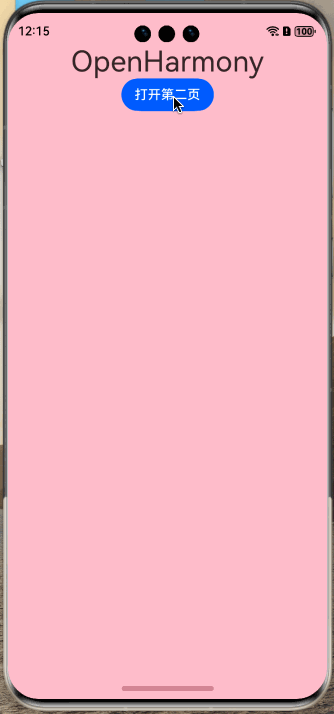
第二个页面逻辑和首页是一致的,笔者就不再贴出来了,样例运行结果如下图所示:
# 18.3.5:小结
以上就是笔者讲解的沉浸式状态的实现供读者参考,也非常欢迎读者给本网站提供更多的开发样例。另外在正式开发过程中,读者可以自己定义一个通用的根组件,避免在每一个页面都要处理 paddingTop 的问题。