# 18.9:全局对象globalThis
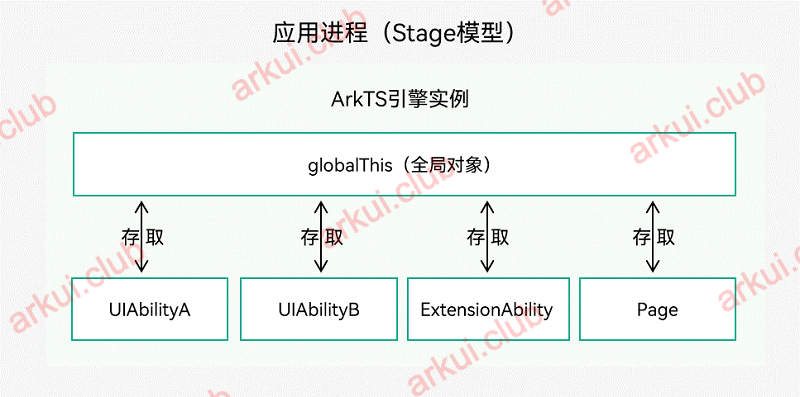
globalThis 是 ArkTS 引擎实例内部的一个全局对象,在该引擎实例下所有的 Ability、ExtensionAbility、Page 都可以访问并使用它,因此可以通过 globalThis 绑定属性或方法来进行数据同步,以 Stage 模型为例 globalThis 的作用域如下图所示:
# 18.9.1:页面间传值
笔者在第七章第 4 节讲到页面跳转分为页面内跳转和页面间跳转,页面内跳转使用 router,页面间跳转使用 want,它们都可以添加参数,本节笔者演示一下利用 globalThis 实现页面内跳转的参数传递,样例如下:
index.ets 页面
import router from '@ohos.router'

@Entry @Component struct ArkUIClubTest {

  @State message: string = "默认值"

  build() {
    Column({space: 10}) {
      Text(this.message.toString())
        .fontSize(22)

      Button("打开第二页")
        .onClick(() => {
          globalThis.indexParams = { // 给 globalThis 赋予新属性indexParams
            "name": "《ArkUI实战》",
            "site": "www.arkui.club"
          }
          router.pushUrl({           // 打开第二页
            url: "pages/main"
          })
        })
    }
    .width("100%")
    .height("100%")
    .backgroundColor("#aabbcc")
    .padding(10)
  }

  onPageShow() {                     // 返回到当前页时,刷新数据
    if (globalThis.indexParams) {
      this.message = JSON.stringify(globalThis.indexParams)
    }
  }

}
1
2
3
4
5
6
7
8
9
10
11
12
13
14
15
16
17
18
19
20
21
22
23
24
25
26
27
28
29
30
31
32
33
34
35index.ets页面中添加了一个按钮,当点击按钮的时候,给 globalThis 添加了一个 indexParams 属性后并给该属性赋了值,然后页面跳转到main.ets页面。main.ets页面
import router from '@ohos.router';
@Entry @Component struct Main {
  build() {
    Column() {
      Text(JSON.stringify(globalThis.indexParams)) // 直接使用globalThis.indexParams的值
        .fontSize(22)
        .fontWeight(FontWeight.Bold)
      Button("返回上一页")
        .onClick(() => {
          globalThis.indexParams = {               // 重新给indexParams赋值
            "name": "《ArkUI实战》",
            "site": "www.arkui.club",
            "author": "快乐de灰太狼"                 // 添加的新值
          }
          router.back()                            // 页面返回
        })
    }
    .width('100%')
    .height('100%')
    .backgroundColor("#bbaacc")
  }
}
1
2
3
4
5
6
7
8
9
10
11
12
13
14
15
16
17
18
19
20
21
22main.ets页面里 Text 组件直接使用了在index.ets中给 globalThis 添加的 indexParams的值,当点击按钮返回上一页时,重新给 globalThis 的 indexParams 赋予了新值,在返回到 index.ets 后,该页面的 onPageShow() 方法会被调用,然后再该方法里更新了message的值,样例运行结果如下图所示:
📢:onPageShow() 方法属于页面的生命周期方法,有关组件生命周期的讲解,笔者在第九章第 1 节有介绍,不熟悉的读者请自行阅读。
# 18.9.2:全局数据池
globalThis 做为 ArkTS 引擎实例内部的一个全局对象,只要 ArkTS 引擎存在,那么该对象也是一直存在的,因此我们可以对 globalThis 做下包装,把它作为应用的全局数据池来使用,比如应用内有个全局数据管理类 DataManager,它对外提供一个增删改查数据的能力,伪代码实现步骤如下:
定义数据源接口 IDataSource
// 定义一个数据接口
interface IDataSource {
  putData(key: string, value: any)
  getData(key: string, defaultValue: any): any
  clear(key: string)
  clearAll()
}
1
2
3
4
5
6
7IDataSource定义了数据保存、查询和清理操作,具体实现由各实现类来完成。实现数据源接口 IDataSource
// 内存缓存实现
class MemoryDataSourceImpl implements IDataSource {

  private mDataEntry: HashMap<string, any> = new HashMap();

  putData(key: string, value: any) {
    this.mDataEntry.set(key, value);
  }

  getData(key: string, defaultValue: any): any {
    var data = this.mDataEntry.get(key);
    if (data) {
      return data;
    }
    return defaultValue;
  }

  clear(key: string) {
    this.mDataEntry.remove(key);
  }

  clearAll() {
    this.mDataEntry.clear();
  }

}

// 磁盘缓存实现
class DiskDataSourceImpl implements IDataSource {

  putData(key: string, value: any) {
  }

  getData(key: string, defaultValue: any): any {
    return ""
  }

  clear(key: string) {
  }

  clearAll() {
  }
}

// 无缓存实现
class UnCacheDataSourceImpl implements IDataSource {

  putData(key: string, value: any) {
  }

  getData(key: string, defaultValue: any): any {
    return null
  }

  clear(key: string) {
  }

  clearAll() {
  }
}
1
2
3
4
5
6
7
8
9
10
11
12
13
14
15
16
17
18
19
20
21
22
23
24
25
26
27
28
29
30
31
32
33
34
35
36
37
38
39
40
41
42
43
44
45
46
47
48
49
50
51
52
53
54
55
56
57
58
59
60MemoryDataSourceImpl、DiskDataSourceImpl和EmptyDataSourceImpl都实现了IDataSource接口并实现了该接口定义的方法,它们分别把数据存储在内存、磁盘和无缓存实现数据管理类 DataManager
export class DataManager {

  public static DATA_SOURCE_MEMORY = 0;
  public static DATA_SOURCE_DISK   = 1;
  public static DATA_SOURCE_EMPTY  = 2;

  private mDataSourceMap: HashMap<number, IDataSource> = new HashMap();

  public constructor() {
    this.mDataSourceMap.set(DataManager.DATA_SOURCE_MEMORY, new MemoryDataSourceImpl());
    this.mDataSourceMap.set(DataManager.DATA_SOURCE_DISK, new DiskDataSourceImpl());
    this.mDataSourceMap.set(DataManager.DATA_SOURCE_EMPTY, new UnCacheDataSourceImpl());
  }

  public static getDataSource(dataSource: number = DataManager.DATA_SOURCE_MEMORY): IDataSource {
    // 借助globalThis存储DataManager对象sInstance
    if (globalThis.dataManager == null || globalThis.dataManager == undefined) {
      // 借助globalThis存储DataManager对象sInstance
      globalThis.dataManager = new DataManager()
    }

    var dataManager = globalThis.dataManager as DataManager;
    var dataSourceImpl = dataManager.mDataSourceMap.get(dataSource)
    if (null == dataSourceImpl) {
      dataSourceImpl = dataManager.mDataSourceMap.get(DataManager.DATA_SOURCE_MEMORY)
    }

    return dataSourceImpl
  }
}
1
2
3
4
5
6
7
8
9
10
11
12
13
14
15
16
17
18
19
20
21
22
23
24
25
26
27
28
29
30DataManager默认提供了三种数据缓存实现类,用户可以通过 getDataSource() 方法拿到对应的IDataSource实例。测试样例
index.ets 页面
import router from '@ohos.router'

import { DataManager } from "./../data/DataManager"

@Entry @Component struct ArkUIClubTest {

  @State message: string = "默认值"

  build() {
    Column({space: 10}) {
      Text(this.message.toString())
        .fontSize(22)

      Button("打开第二页")
        .onClick(() => {
          var indexParams = {
            "name": "《ArkUI实战》",
            "site": "www.arkui.club"
          }
          DataManager.getDataSource().putData("indexParams", indexParams)
          router.pushUrl({
            url: "pages/main"
          })
        })
    }
    .width("100%")
    .height("100%")
    .backgroundColor("#aabbcc")
    .padding(10)
  }

  onPageShow() {
    this.message = JSON.stringify(DataManager.getDataSource().getData("indexParams", "默认值"))
  }
}
1
2
3
4
5
6
7
8
9
10
11
12
13
14
15
16
17
18
19
20
21
22
23
24
25
26
27
28
29
30
31
32
33
34
35main.ets页面
import router from '@ohos.router';
import {DataManager} from './../data/DataManager'

@Entry @Component struct Main {
  build() {
    Stack() {
      Column() {
        Text(JSON.stringify(DataManager.getDataSource().getData("indexParams", "{}"))) // 直接从 DataManager 中取值
          .fontSize(22)
          .fontWeight(FontWeight.Bold)
        Button("返回上一页")
          .onClick(() => {
            DataManager.getDataSource().putData("test", {
              "name": "《ArkUI实战》",
              "site": "www.arkui.club",
              "author": "快乐de灰太狼"                 // 添加的新值
            })
            router.back()                            // 页面返回
          })
      }
      .width('100%')
      .height('100%')
      .backgroundColor("#bbaacc")

      Image($r("app.media.bg")).enabled(false)
    }
    .width('100%')
    .height('100%')
  }
}
1
2
3
4
5
6
7
8
9
10
11
12
13
14
15
16
17
18
19
20
21
22
23
24
25
26
27
28
29
30
样例运行结果如下图所示:
📢:有关 globalThis 的更多介绍,可参考官方文档 (opens new window)
# 18.9.3:小结
本节简单演示了利用 globalThis 全局特性做数据池的用法,需要注意的是在正式应用开发中要防止数据被覆盖的情况出现,最后也非常欢迎小伙伴能给本网站提供更多的开发样例。