# 11.2:进程内事件
Emitter 英文的意思为发射器,它和上节 @ohos.commonEvent 模块讲述的功能类似,也是处理事件的订阅和发布,和 commonEvent 不同的是,Emitter 发送的事件作用域只能在APP内部,而 commonEvent 发布的事件作用域不仅仅在APP内部还可以在App之间,本节简单介绍一下 Emitter 的使用。
# 11.2.1:Emitter定义介绍
declare namespace emitter {
  function on(event: InnerEvent, callback: Callback<EventData>): void;
  function once(event: InnerEvent, callback: Callback<EventData>): void;
  function off(eventId: number): void;
  function emit(event: InnerEvent, data?: EventData): void;
}
1
2
3
4
5
6
2
3
4
5
6
on:开启订阅事件,event 表示订阅的具体事件,callbak 表示匹配到事件后的回调。
off:结束订阅事件,后续即使有事件也不再会回调。
once:只订阅一次事件,后续即使有事件也不再会回调。
emit:发布事件,event 表示订阅的具体事件,data 表示发布事件的额外参数。
# 11.2.2:Emitter订阅事件
引入emitter包
import { emitter } from '@kit.BasicServicesKit';1开启事件订阅
emitter.on({
  eventId: 10086,                      // 指定事件ID
  priority: emitter.EventPriority.HIGH // 事件优先级
}, (data) => {                         // 事件回调
  console.log("")
})
1
2
3
4
5
6
# 11.2.3:Emitter发布事件
发布事件
emitter.emit({
  eventId: 10086,                           // 事件ID
  priority: emitter.EventPriority.IMMEDIATE // 事件优先级
})
1
2
3
4
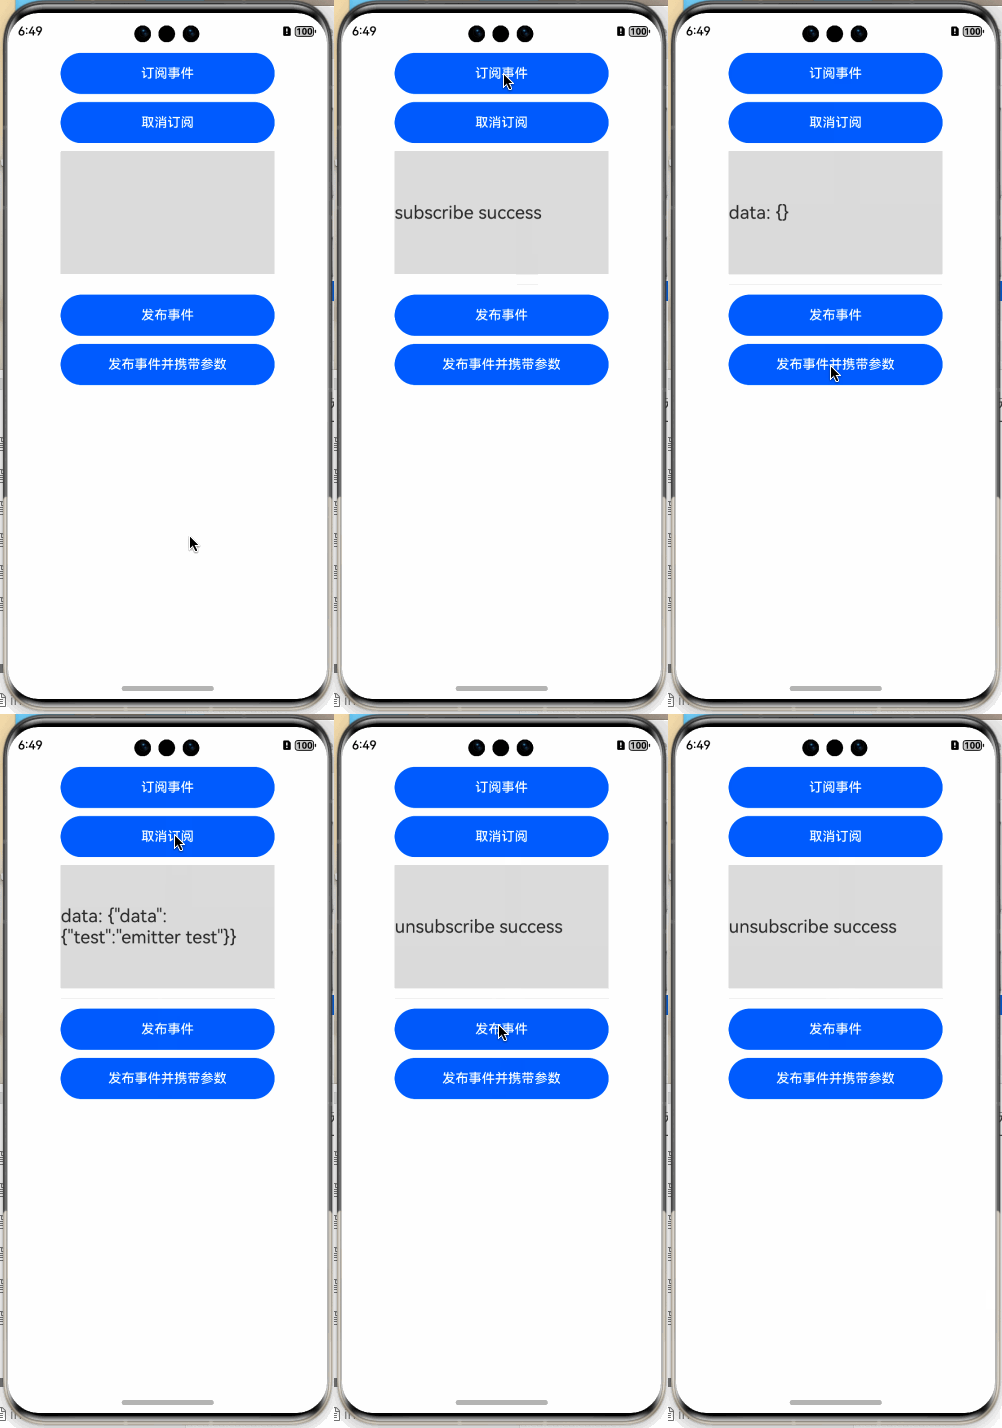
以上就是事件的订阅和发布用法,接下来我们举一个简单示例样式一下:
import emitter from '@ohos.events.emitter';

@Entry @Component struct Index {

  @State text: string = "";

  private subscribe() {
    emitter.on({                                // 开启事件订阅
      eventId: 10086,                           // 指定事件的ID
      priority: emitter.EventPriority.IMMEDIATE // 事件的优先级
    }, (data) => {                              // 事件回调
      if(data) {
        this.text = "data: " + JSON.stringify(data);
      } else {
        this.text = "none data";
      }
    })
    this.text = "subscribe success";
  }

  private unsubscribe() {
    emitter.off(10086);                         // 取消订阅事件
    this.text = "unsubscribe success";
  }

  private publishEvent() {
    emitter.emit({                              // 发布事件
      eventId: 10086,                           // 指定事件ID
      priority: emitter.EventPriority.IMMEDIATE // 指定事件优先级
    })
  }

  private publishEventWithData() {
    emitter.emit({
      eventId: 10086,                           // 发布事件
      priority: emitter.EventPriority.IMMEDIATE // 指定事件优先级
    }, {                                        // 添加额外参数
      data: {
        "test": 'emitter test'
      }
    })
  }


  build() {
    Column({space: 10}) {
      Button("订阅事件")
        .size({width: 260, height: 50})
        .onClick(() => {
          this.subscribe();
        })

      Button("取消订阅")
        .size({width: 260, height: 50})
        .onClick(() => {
          this.unsubscribe();
        })

      Text(this.text)
        .size({width: 260, height: 150})
        .fontSize(22)
        .backgroundColor("#dbdbdb")

      Divider()
        .size({width: 260, height: 5})

      Button("发布事件")
        .size({width: 260, height: 50})
        .onClick(() => {
          this.publishEvent();
        })

      Button("发布事件并携带参数")
        .size({width: 260, height: 50})
        .onClick(() => {
          this.publishEventWithData();
        })

    }
    .padding(10)
    .size({width: "100%", height: '100%'})
  }
}
1
2
3
4
5
6
7
8
9
10
11
12
13
14
15
16
17
18
19
20
21
22
23
24
25
26
27
28
29
30
31
32
33
34
35
36
37
38
39
40
41
42
43
44
45
46
47
48
49
50
51
52
53
54
55
56
57
58
59
60
61
62
63
64
65
66
67
68
69
70
71
72
73
74
75
76
77
78
79
80
81
82
83
2
3
4
5
6
7
8
9
10
11
12
13
14
15
16
17
18
19
20
21
22
23
24
25
26
27
28
29
30
31
32
33
34
35
36
37
38
39
40
41
42
43
44
45
46
47
48
49
50
51
52
53
54
55
56
57
58
59
60
61
62
63
64
65
66
67
68
69
70
71
72
73
74
75
76
77
78
79
80
81
82
83
样例很简单,首先订阅事件,在订阅事件时指定事件的ID,然后开始订阅,当有匹配的事件时,会回调给订阅者,运行结果如下图所示:

# 11.2.3:小结
Emitter 的使用很简单,它和 EventBus 比较类似,发送和接收事件都是在 APP 内部处理不能跨进程,使用 Emitter 解耦业务是很方便的。
← 11.1:公共事件 11.3:后台代理提醒 →

请作者喝杯咖啡
©arkui.club版权所有,禁止私自转发、克隆网站。
