# 11.4:通知(Notification)
通知(Notification)的应用非常广泛,比如新闻类 APP 在有重大新闻发生时都会推送给用户一条通知,比如微信在未打开的情况下如果有人给你发消息也会给你推送一个通知,这里的通知就是使用 Notificatin 模块里的 API 实现的,本节读者简单介绍一下如何发送和取消通知。
# 11.4.1:notificationManager定义介绍
// notification模块
declare namespace notificationManager {
	// 发布通知
  function publish(request: NotificationRequest, callback: AsyncCallback<void>): void;
	// 取消通知
  function cancel(id: number, callback: AsyncCallback<void>): void;
	// 取消所有
  function cancelAll(callback: AsyncCallback<void>): void;
	// 获取当前应用的活动通知数
  function getActiveNotificationCount(callback: AsyncCallback<number>): void;
	// 获取所有有效的通知
  function getActiveNotifications(callback: AsyncCallback<Array<NotificationRequest>>): void;

  // 省略部分API

}
2
3
4
5
6
7
8
9
10
11
12
13
14
15
16
publish:发布一条通知,
NotificationRequest参数说明如下:id:通知ID,可通过此ID取消该通知。
content:通知内容。
isUnremovable:是否可移除。
extraInfo:扩展参数。
smallIcon:通知小图标。
largeIcon:通知大图标。
isFloatingIcon:是否显示状态栏图标。
wantAgent:点击通知跳转的WantAgent。
autoDeletedTime:通知自动清楚的时间。
NotificationRequest参数非常多,这里就不一一列出了,读者可自行阅读一下源码。
cancel:取消与指定
id相匹配的已发布通知。cancelAll:取消所有已发布的通知。
getActiveNotificationCount:获取当前应用的活动通知数。
getActiveNotifications:获取当前应用的所有活动通知。
# 11.4.2:Notification 使用步骤
引入notificationManager模块
import { notificationManager } from '@kit.NotificationKit';1发布Notification
private publishNotification() {
  let contentType = notificationManager.ContentType.NOTIFICATION_CONTENT_BASIC_TEXT;
  notificationManager.publish({             // 发布通知
    content: {                              // 通知内容
      notificationContentType: contentType, // 通知类型,当前为文本类型
      normal: {
        title: "测试标题",                   // 通知标题
        text: "测试内容",                    // 通知内容
        additionalText: "测试额外数据"        // 通知额外数据
      }
    },
    id: 10086,                              // 通知id,取消通知需要用到该ID
    color: Color.Pink,                      // 通知背景颜色
    colorEnabled: true,                     // 开启通知背景颜色
    label: "测试标签" + this.id,             // 通知标签
    badgeIconStyle: 20                      // 通知角标
  }, () => {                                // 通知发送回调
    prompt.showToast({
      message: "发送通知"
    })
  })
}
1
2
3
4
5
6
7
8
9
10
11
12
13
14
15
16
17
18
19
20
21
22取消Notification
private cancelNotification() {
  this.ids--;
  notificationManager.cancel(this.ids, () => {
    promptAction.showToast({
      message: "取消通知" + this.id
    })
  })
}
1
2
3
4
5
6
7
8取消所有Notification
private cancelAllNotification() {
  notificationManager.cancelAll(() => {
    promptAction.showToast({
      message: "取消所有通知"
    })
  })
}
1
2
3
4
5
6
7
# 11.4.3:Notification 完整样例
import { promptAction } from '@kit.ArkUI';
import { BusinessError } from '@kit.BasicServicesKit';
import { notificationManager } from '@kit.NotificationKit';

@Entry @Component struct NotificationTest {

  private ids: number = 10086;
  private error: string = "";

  build() {
    Column({ space: 10 }) {
      Button('发布通知')
        .onClick(() => {
          this.publishNotification();
        })
      Button('取消通知')
        .onClick(() => {
          this.cancelNotification();
        })
      Button('取消所有通知')
        .onClick(() => {
          this.cancelAllNotification();
        })

      Text(this.error)
        .fontSize(20)
    }
    .width('100%')
    .height('100%')
    .padding(10)
  }

  private cancelAllNotification() {
    notificationManager.cancelAll(() => {
      promptAction.showToast({
        message: "取消所有通知"
      })
    })
  }

  private cancelNotification() {
    this.ids--;
    notificationManager.cancel(this.ids, () => {
      promptAction.showToast({
        message: "取消通知" + this.id
      })
    })
  }

  private publishNotification() {
    console.log("publish")
    let contentType = notificationManager.ContentType.NOTIFICATION_CONTENT_BASIC_TEXT;
    notificationManager.publish({
      content: {
        notificationContentType: contentType,
        normal: {
          title: "测试标题" + this.id,
          text: "测试内容" + this.id,
          additionalText: "测试额外数据" + this.id
        }
      },
      id: this.ids,
      color: 0xff0000,
      colorEnabled: true,
      label: "测试标签" + this.id,
      badgeIconStyle: 20
    }, (error: BusinessError) => {
      if(error) {
        this.error = JSON.stringify(error);
      } else {
        this.ids++;
        promptAction.showToast({
          message: "发送成功"
        })
      }
    })
  }
}
2
3
4
5
6
7
8
9
10
11
12
13
14
15
16
17
18
19
20
21
22
23
24
25
26
27
28
29
30
31
32
33
34
35
36
37
38
39
40
41
42
43
44
45
46
47
48
49
50
51
52
53
54
55
56
57
58
59
60
61
62
63
64
65
66
67
68
69
70
71
72
73
74
75
76
77
78
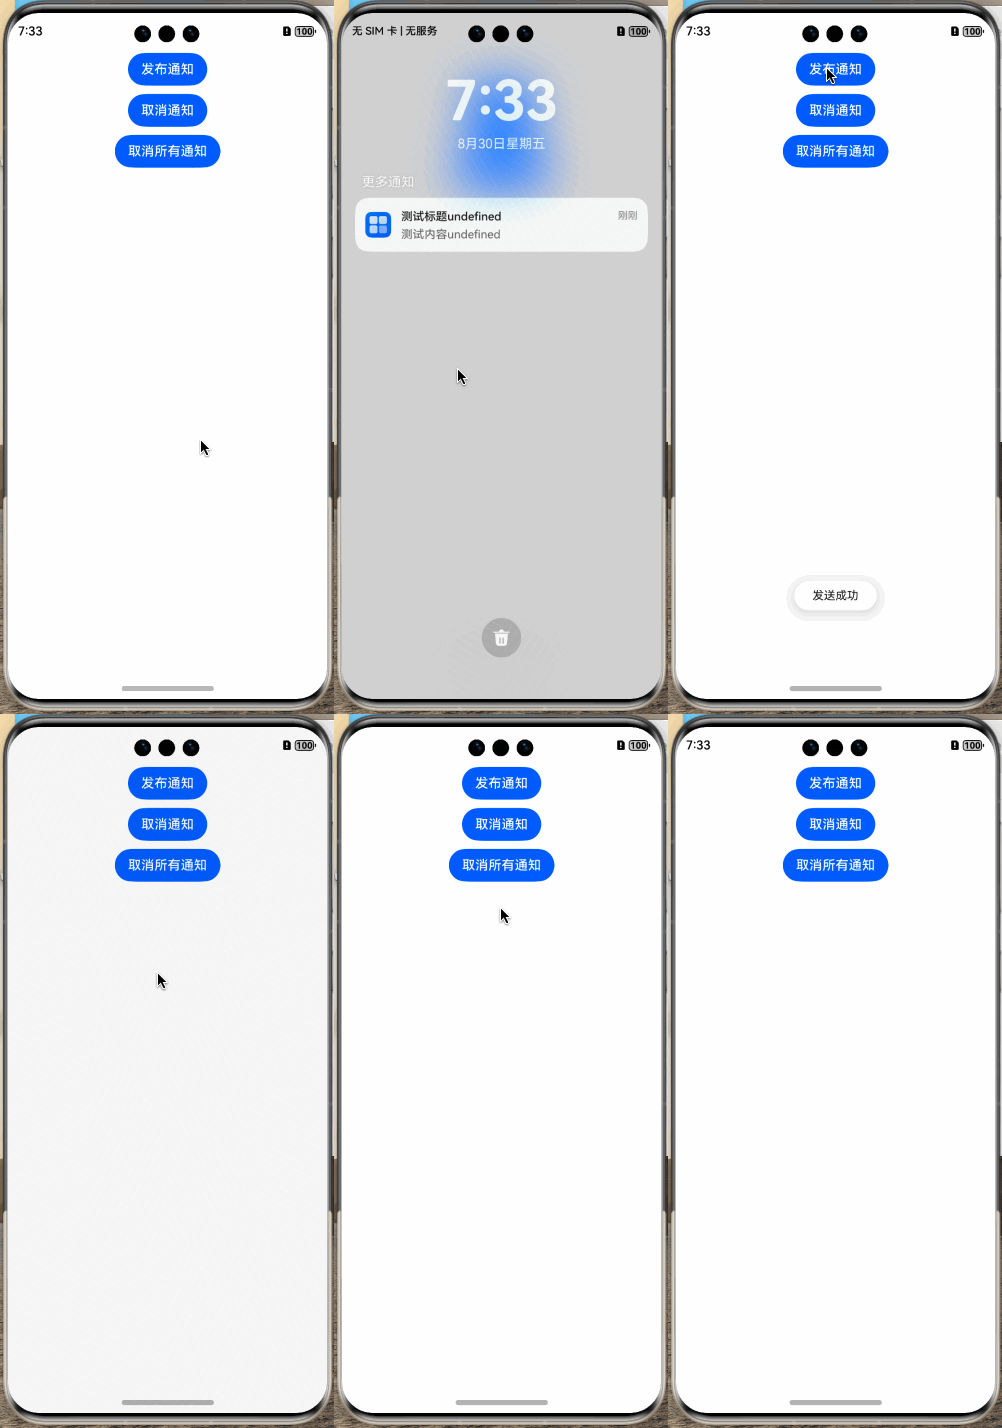
样例运行结果如下图所示:

# 11.4.4:小结
本节介绍了 Notification 的发送与取消的实现方法,由于笔者条件有限没有相关设备,该样例在 HarmonyOS API 7 模拟器上做的演示,根据演示效果看取消通知没有效果,笔者已经把该问题反馈给 OpenHarmony 了,如果读者有开发板等设备可以帮忙验证一下,十分感谢!
← 11.3:后台代理提醒 12.1:文件操作 →

