# 12.4:Socket
Socket 是应用层与 TCP/IP 协议族通信的抽象层,它提供了一套标准接口。从设计模式的角度看,Socket 其实就是一个门面模式,它把复杂的 TCP/IP 协议族屏蔽在 Socket 内部,给开发者提供了一套标准 API 。本节笔者简单介绍一下 @ohos.net.socket 模块相关API的使用。
# 12.4.1:限制与约束
DevEco Studio 的 预览器暂不支持网络请求,只能在模拟器或真机上进行。
发起 http 网络请求需要申请 ohos.permission.INTERNET 权限。
# 12.4.2:Socket通信过程
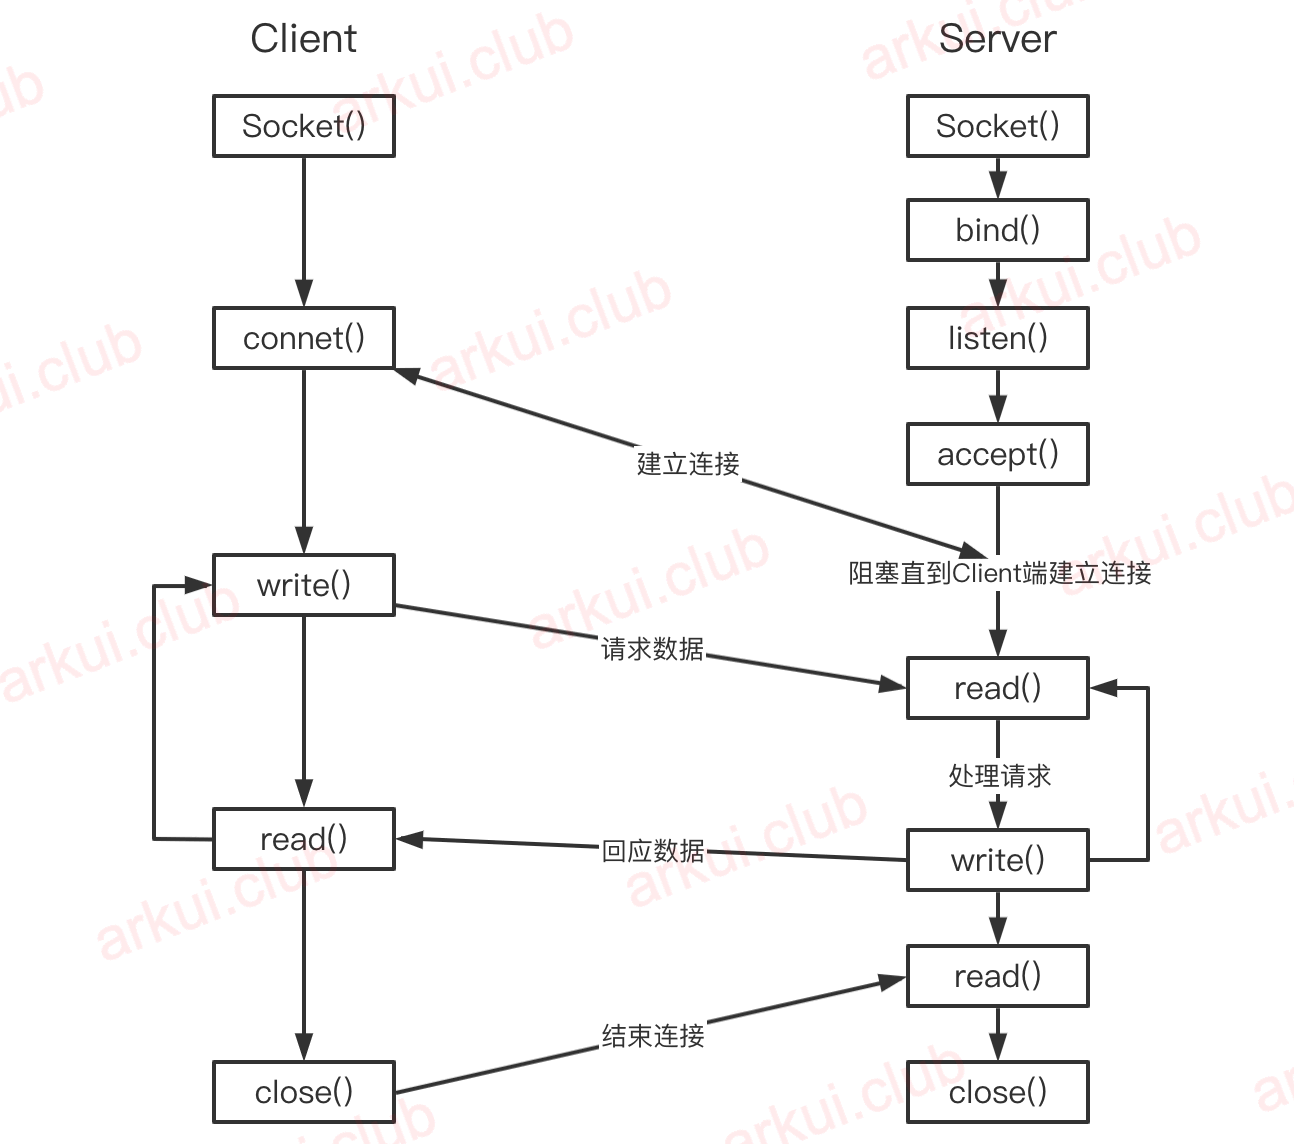
常见的 Http 协议和FTP协议等都属于应用层协议,这些应用层协议底层都是通过 Socket API 实现的,Socket 的通信过程是:
首先 Server 端初始化一个 Socket,然后与端口绑定(调用 bind() 方法)并对端口进行监听(调用 listen() 方法),接着调用 accept() 方法阻塞,等待着客户端连接。
这个时候如果有 Client 初始化了一个 Socket ,然后连接到 Server(调用connec()方法),如果连接成功,这时候 Client 就和 Server 建立了连接,Client 端向 Server 端发送请求,Server 端收到请求并把处理结果发送给 Client 端,Client端读取数据并关闭连接(调用close()方法),本次交互结束。
整个通信过程如下图所示:
# 12.4.3:Socket定义介绍
@ohos.net.socket 模块提供的 Socket API 根据协议分为两种 Socket,分别是支持 TCP 的 Socket 和支持 UDP 的 Socket,笔者简单介绍一下 TCPSocket :
declare namespace socket {

  // 创建一个TCPSocket
  function constructTCPSocketInstance(): TCPSocket;

  // 省略部分源码

  export interface TCPSocket {

    bind(address: NetAddress, callback: AsyncCallback<void>): void;

    connect(options: TCPConnectOptions, callback: AsyncCallback<void>): void;

    send(options: TCPSendOptions, callback: AsyncCallback<void>): void;

    close(callback: AsyncCallback<void>): void;

    on(type: 'message', callback: Callback<{message: ArrayBuffer, remoteInfo: SocketRemoteInfo}>): void;

    off(type: 'message', callback?: Callback<{message: ArrayBuffer, remoteInfo: SocketRemoteInfo}>): void;

    on(type: 'connect' | 'close', callback: Callback<void>): void;

    off(type: 'connect' | 'close', callback?: Callback<void>): void;

    on(type: 'error', callback: ErrorCallback): void;

    off(type: 'error', callback?: ErrorCallback): void;

    // 省略部分API
  }
}
2
3
4
5
6
7
8
9
10
11
12
13
14
15
16
17
18
19
20
21
22
23
24
25
26
27
28
29
30
31
32
- constructTCPSocketInstance:创建一个
TCPSocket。 - connect:连接目标服务器。
- bind:绑定端口。
- send:发送数据。
- close:关闭连接。
- on:打开对应事件的监听。
- off:关闭对应事件的监听。
# 12.4.4:Socket完整样例
笔者使用 TCPSocket 请求百度首页为例,向读者延时一下 TCPSocket 的使用,样例如下:
import socket from '@ohos.net.socket';

@Entry @Component struct SocketTest {

  @State error: string = "";
  @State text: string = "";

  build() {
    Column({ space: 10 }) {
      Button('发起请求')
        .onClick(() => {
          this.request();
        })

      Text(this.error)
        .fontSize(20)

      Text(this.text)
        .fontSize(20)
    }
    .width('100%')
    .height('100%')
    .padding(10)
  }

  private request() {
    let tcpSocket = socket.constructTCPSocketInstance(); // 创建TCPSocket
    tcpSocket.on("message", (data) => {
      this.text = JSON.stringify(data.remoteInfo);       // 监听服务器消息回调
    });
    tcpSocket.connect({                                  // 连接服务器
      address: {
        address: "baidu.com",                            // 地址
        port: 80                                         // 端口
      },
      timeout: 5000
    }, (error) => {
      if(error) {
        this.error = JSON.stringify(error);
      } else {
        this.error = "connect success";
        let data = "GET / HTTP/1.1\n" +
                   "Host:baidu.com\n"                    // 发送数据
        tcpSocket.send({                                 // 连接建立后,发送数据
          data: data,
          encoding: "utf-8"
        }, (error) => {
          if(error) {
            this.error = JSON.stringify(error);
          } else {
            this.error = "send success";
          }
        })
      }
    })
  }
}
2
3
4
5
6
7
8
9
10
11
12
13
14
15
16
17
18
19
20
21
22
23
24
25
26
27
28
29
30
31
32
33
34
35
36
37
38
39
40
41
42
43
44
45
46
47
48
49
50
51
52
53
54
55
56
57
样例运行结果如下图所示:

# 12.4.5:小结
本节介绍并演示了使用 Socket 发送数据的简单用法,如果自带请求库不满足要求或者是需要自定义协议,读者可以使用 Socket 封装自己的网络库,自实现发送和解析数据即可。